I’ve been reading up on how to insert YouTube videos in various delivery mechanisms such as websites and blog engines (such as this one) when I came across a really cool video about inserting YouTube videos in, what else, PowerPoint! I’ve used embedded video in PowerPoint for awhile now but never considered embedding YouTube content. For those of you familiar with embedding flash video in your presentations, you will find the steps outlined in this video to be very familiar.
Accurate Information
For this week’s post, I am once again deferring to our instructor. I am in the process of developing some short media clips that I intend to add to this blog eventually. This week at my place of employment, we revised 33 PowerPointlectures and by the way, the project was due today. Why am I telling you this, well, it’s because we wouldn’t have been able to accomplish our goal unless we employed many of the techniques that I’ll eventually show you.
As a former instructor, I learned that sometimes it’s necessary to include audio when presenting complex computer aided instruction. I can follow along with a narrator while I’m performing the task as described. Unfortunately, I don’t have any ready for “prime time” just yet.
So for this week’s post, I’m going to feature Mike Murdock’s Podbean post that he has so graciously shared with us. I particularly enjoyed his post Accurate Information. I think he makes a very interesting and salient point about the various sources we run into on a daily basis. Considering the amount of information we can get from all the various websites, this is definitely something to think about and consider.
How does this fit into this blog? Quite simply, there are many different ways to create a PowerPoint lecture and you’ll find differing techniques all over the web on how to perform the steps required for a desired result. I will always try to provide you with my take on these steps and share some tips I’ve learned to give you what Mike spoke of; that is accurate information.
Time for something from me…
I’m going take moment to go a little deeper into why this blog exists. I’m in the process of earning a degree from Skagit Valley College ( http://www.skagit.edu/default.asp ) a small school located in the picturesque Pacific Northwest. My instructor for this course Mr. Michael Murdock, is a web developer and is passing on his knowledge to us.
As with most web site developers, I like to delve into digital photography on the side. Michael invited us to view his flickr®, page where he has graciously shared some of his photography with us, you can view his page at https://www.flickr.com/photos/mwmurdock. I think you’ll be glad you did, he has some amazing photography on his site. I must say it almost inspired me to create my own flicka® site, I’m just not sure I want to at this time. Who knows, maybe if I get enough encouraging comments, maybe I will.
As I was surfing around his page, I found a picture that I liked of Snoqualmie Falls which is just off Interstate 90 in Washington State, east of Seattle.
Even though I have lived in Washington for over 30 years now, this is one place that I’ve yet to visit.
After viewing his page, I think it’s about time for me to make the trip!
Starting your PowerPoint – Setting a background using the Slide Master.
So now we’re ready to get to work!
I’ve opened power point and by golly there is a lot to choose from when it comes to “canned” layouts. I don’t use any of them! Not that they are bad mind you, I’m just a control freak who has to do everything myself. Therefore for the purposes of this post, I’ll be opening a blank presentation.
Once you’ve opened your blank presentation, as the song from Meatloaf says – “STOP RIGHT THERE!”
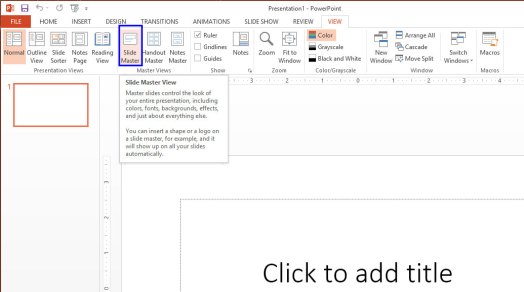
I’d like to direct your attention to the “View” tab. Click on it and you’ll open up the View menu and that’s where you want to be for this discussion. Refer to the image if you are having difficulty locating the tab.
 When you have it open click on the slide master, I have it highlighted and the tool tip is turned on. It gives you a better explanation of what the slide master is all about.
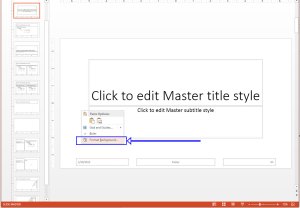
 You’ll see a screen that looks like the one below, what I’d like you to do is right click anywhere in the slide area to bring up the context menu and from there select “Format Background.”
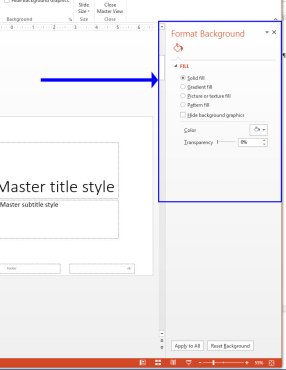
A window will open on the right which is where we will be working today
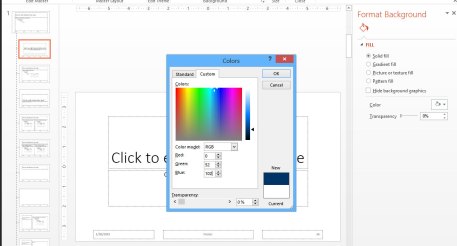
Ive selected the color option, and from there, we’ll select more colors, you can see it just below the standard color squares

If you have ever used any of the various versions of PowerPoint, you have probably seen and most likely used this window before, for this exercise, I will be using a custom color and you can get to the custom color dialog by clicking on the “Custom” tag. I used Red-Green-Blue values of 0-52-102 as shown in the graphic because this is one I use quite frequently in presentations I prepare where I work.
Lastly click “OK.”
Notice that only one of you master slides have the background we just made. You can ally different background to each of your master layout slides by selecting the layout you want on the left and then following the steps I just showed you to set the background.
I STRONGLY recommend you don’t do this or do it sparingly however, you don’t want the slide layout over shadow the message you are trying to convey with you presentation. So we will click the “apply to all button to apply our background to all of our possible layouts.
 I took the liberty of jumping ahead a bit and turned my font white so you can see them, I show you how to do that in my next post, but for now here is the result

Click on “Close Master view”
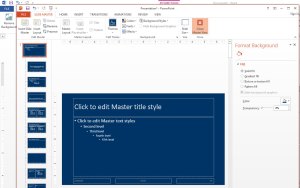
Here is what your screen should look like:

The beauty of using this method is that all of your subsequent slides will have this background. It must be noted that I used Office 2013 to set up this demo. If you would like to know how to set the background in earlier versions of PowerPoint, leave me a comment and I’ll get right back to you!
Also, let me know whether or not you found following my post easy to follow. I have found following video tutorials somewhat troublesome at times because, the person giving the tutorial knows what they are doing and they move right along while I’m trying to keep up! I hope you found this format helpful.
A note about backgrounds
One more thing….
In my last entry, I asked the question, ”How is the PowerPoint going to be delivered?”
Let me expand on this a bit. I have sat through presentations that have been projected, shown on a computer screen, HDTV, all the way to a bed sheet hung from the overhead (Navy term for ceiling). When planning your presentation, knowing how the PowerPoint will be delivered will drive factors such as the background which is what I’m going to concentrate on here.
PowerPoint defaults to a white background with black letters if you open a blank presentation (which is what I will be using when we get into the meat of putting a presentation together). I have developed literally hundreds of presentations using this color scheme. It provides excellent contrast, it’s simple, and you don’t have to worry about differences in monitors, projectors, etc.
There is a problem however! If the delivery method is a projector onto a white board, somebody is going to get blasted with glare from the projector. Some of your content will be washed out or lost all together. For the sake of this discussion, say you have to use a color scheme conforming to an organization’s standard and you can’t deviate too much. So how do I mitigate this without deviating from a basic black and white format?
I’ll show you how to do this later on but for now, I’ll just talk about it briefly. To mute the glare (you won’t get rid of it all), I recommend using a gray (red-green-blue value 221-221-221) or an egg-shell white (red-green-blue value 255-255-204). I have used these backgrounds and they look almost white on screen but they also have the effect of muting the glare reflected off the white board from the projector.
If you have another delivery method such as an HDTV or a computer, you will find these colors work very well in those environments as well. Of course, if you are allowed to use other backgrounds, you can select from a myriad of darker shades that will mitigate this problem entirely.
Before You Start
Before you start…
If you’re like me, you want to get right to the meat of a task and not mess around with a whole lot of fluff. In this case, however, a few minutes of preparation can save you a whole lot of heartache on the back end. You see, I make a living on the back end, post-production if you will, and I fix many mistakes people have made by not planning ahead when they made their PowerPoint presentation.
Before you even open the program, here are some questions you may want to consider when given a project to develop. This is by no means a complete list but I hope it gets the ideas flowing!
Perhaps the most important question you need to ask when starting your project is “Who is my audience?” By knowing your audience up front will allow you to make decisions as to the detail and thus the number of slides you’ll need to include in your presentation. The lessons I develop are given to people who have already attended some sort of basic course on the subject and have an understanding of what we are talking about. I’ll immediately bore them to tears by providing information they already know and they will tune out. The flip side of this are those people who know nothing of the topic and if I start with information that is way “over their head,” again they will tune out. I don’t care how much effort goes into a presentation, or how much pizazz it may have, if it isn’t to the right level, you will have an ineffective PowerPoint on your hands. These are the two extremes. Mostly, however, you will be tasked with developing a presentation that is somewhere in between. Take a few minutes to determine who your audience is before you start.
The next question I ask when I start up a new project is “Where is the presentation going to be given?” This question will drive mundane things like graphics clarity, font size, colors, etc. I find myself worrying more about the smallest font size rather than the largest when I’m developing a PowerPoint. As a general “rule of thumb,” I try to keep my font size no smaller than about 18 point regardless of the size of the presentation venue. I’ll talk about this more in a later post.
These two questions will help you to start but another, often overlooked question is “How is the PowerPoint going to be delivered?” This may seem like an easily answered question and often times it is – BUT – often this question will lead to other questions such as “Is this PowerPoint going to be given by a presenter, delivered on-line or as an informational loop you may have seen at a Doctor’s office, etc.” Again, answers to these questions will drive things like color, graphics, content, etc.
Since we are just beginning to plan our presentation, I’ll stop here for now but I hope you may be coming up with ideas of what to do when you are planning your presentation. Essentially, you are asking yourself the 5 W’s and the odd “H”– that is; Who, What, Where, When, Why and How. I only covered three of them and that should be enough to get you started. To get the juices flowing as it were…
Until next time…
Welcome to this blog!
Hello!
I’m Bill Lamson. So who am I and why should you listen to me?
I am a former Instructor for the US Navy and have been developing PowerPoint presentations since around 1997. When I retired from the Navy in 2000, I was lucky enough to find a job where I could use my skills as an instructor maintaining and developing courseware for the training commands that are located here in the great Northwest.
Over the years, I have heard people exclaim “it’s just PowerPoint, how hard can it be?” Well… truth is, it’s not! BUT – I have, and I’m sure you have, sat through lectures where the subject of the presentation was lost because the show concentrated on “bells and whistles.”
So, with this in mind, each week I’ll add content and show hints and tips gleaned over the years. I am by no means an expert in all facets of PowerPoint but perhaps together we can come up with presentations that are professional, informative and a pleasure to sit through!

